X-10 Home Automation | Web Site tricks & Tips | Personal Security Products
|
X-10 Home Automation | Web Site tricks & Tips | Personal Security Products |
We have been installing vacuum systems since 1976. This document contains tips from our many years of experience.
To determine if a vacuum system can be installed in your home, you need to see to how to install it!
These tips are to be used to determine if a built
in vacuum
system can be installed in your home. Then if a vacuum system can be
installed these tips will help you install it. Use it with
Cana-Vac’s
manual. You cannot install a vacuum system using information
from
this
file only! You will need a PDF reader like Foxit or Adobe
reader. I prefer Foxit it is a lot faster.
We do not want you to purchase a system
and find
that you cannot install it. So take your time checking your home
before
ordering.
Once you have determent that installing a vacuum system is possible
(or
maybe possible) you next need to decide where the power unit is to be
located.
Next see find the placement of the inlets.
Once you have determined that you have paths from all the proposed inlet locations to the proposed power unit location you now know that a central vacuum can be installed in your home!
Where to put the vacuum system power unit?
In the garage, under the house, in closets, under stairs, utility
room,
attic, (not preferred
you do not what to go up if not necessary, also attics are
hot). It is preferred to
mount it on
a outside wall so the vibration and noise is less. Think about the
noise it will
make so
do not mount it on a wall that is being shared with a bedroom for
example.
Usually the vacuum unit is mounted in the garage.
Many homes with 2 or more floors have a room above the garage. The tubing can be surface run in the garage, to a floor inlet in second floor. Since the second floor in two floor home is usually smaller, one inlet in enough to cover the floor.
Be careful before opening walls! You can run the tubing on the
surface
wall or floor inside of a closet. Sometimes one can get the tubing to
an attic
or attic roof overhang to the second floor surface run in the
garage.
Plumbing walls, ducting wells and soffits can sometimes run from the
basement
to the top floor or from one part of the home to the other. In
one home I
pushed tubing through a plumbing "well" from the basement to the 2nd
floor to get two vacuum inlets on the 2nd floor with one on the first
floor at
the bottom of the "well". Look for the furnace cold air return, there
is usually empty space around the ducting. Use ducting, wiring or
pipes, vents
as a frame of reference to find out where walls are and access points
are. (Do not run the tubing close to a hot vent or hot water
pipe, it
will melt. Do not run it outside it is thinned walled so it can
soften and
the plastic will get brittle in the sun.) Sometimes one can get
the
tubing to an attic or attic roof overhang to the second floor surface
run in
the garage. Of course blueprints of your home would be very helpful!
One of our customers was so determined to have a built in vacuum
system they
hired a plumber to run 2" ABS plumbing piping on the "outside"
of a multi-story
If you use 2" ABS pipe, use a reamer in the vacuum tubing to taper
the
inside to eliminate any source of clogging since the air will go from
the
larger pipe to the tubing which is inside the pipe. Do not use
any pipe
or tubing smaller than 2"; it will have a tendency to clog and you will
lower the airflow (CFM).
If your house has a concrete slab floor the
tubing, cannot
be run without opening the walls and/or running the tubing in the
attic. If the
walls are opened, running up to the attic works quite well since
anything too
heavy falls down to the inlet valve preventing clogging of the
tubing. If
you have an open beam ceiling with a slab floor home, it cannot be done
at all,)
except running it outside the walls and putting the inlets in outside
walls.) I do not recommend this without construction experience
and
professional tools. If the open beam ceiling home is under
construction,
the piping can be put in the slab before it is poured. Have the
plumber
do this and use 2" ABS or PCV schedule 40 drain pipe. The vacuum
tubing can be connected to the pipe coming out of the slab then run to
the
inlet. I have used the vacuum tubing in
slabs with no problems but would not do it again, I got lucky that they
were
not
damaged in the poring of the concrete or by stepped on my a worker.
2" ABS or PVC schedule 40 waste/drain pipe can be used to run
outside
where it will be exposed to the heat like on the roof or underground to
connect
detached buildings. This is not water pipe with tight (sharp)
fittings. It
is designed for waste with sweep fittings. As mentioned,
vacuum
system tubing is 2" OD, it will fit in the 2" ID pipe. ABS to
PVC pipe is glued with the universal solvent that is designed to glue
ABS and
PVC together.
In Cana-Vac's manual it tells how to install an
inlet in a
closed wall. This is not as easy as it seems. It is really
hard to
hold onto and glue face plate bracket to the tube, (especially if you
have
large hands.) Do not attempt this unless you have lots of time,
professional tool and experience with tools and construction. You
also
need to know what is in the walls. It is easy to drill through a
low volt
wire, like a phone line. You will not be able to predict were the
electrician decided to run wires. If you are lucky not to
hit a wire
or pipe while making the opening for the inlet you then need to keep
your luck
drilling the hole up from under the house directly below the opening
without
hitting any wires or pipes, electricians will nail the cable to the
footer
where you will be drilling. So it is best not to install it
in the
walls.
But if you really need to have the inlets in the walls, choose
locations
where the opposite wall is in a closet or cabinet. Remove a
piece of sheetrock in the closet where it is not seen, and
install
the inlet in the opposite wall. Patches inside the closet will
not be
noticed. If you really need to have all the inlets in the
walls
and have an experience with sheet rock you can cut the sheet rock
carefully,
saving the piece of sheet rock removed, then installing the inlet and
replacing
the sheet rock. You need to have experience
with
patching and texturizing. I do not recommend this unless you are
experienced in working with sheetrock. This will double the time it
takes to
install the vacuum system but can be done for all the inlets. Wood
walls are a
problem stay away from them. It is considerably easier and faster
and
less risky to install in the floor than trying to get the inlet in the
wall
with or without opening it. Inlets plates are normally
mounted so
the door
is opened down. This puts the electrical contacts on top where
they will
not short out from accumulated dust. I have installed inlets
to open
up for customers with children since they will try to step on the down
open
inlets. This is fine but keep the inlet clean so the contacts do not
short. It
is possible to install inlets horizontal. It is more work since
you have
to mount a 2x4 horizontally for the bracket.
To keep the installation simple, plan on installing the inlets in the floor.
Floor mounted inlets
are quick and
requires
basic experience and tools. Be careful with cutting and drilling in
carpet. Some types of carpet will “run" like a stocking. To find
the spot
directly below the proposed location, drill a small hole (1/6") and put
a
painted coat
hanger, (painted so it is easy to see in the dark). To
prevent running
your carpet get a 6" long 1/8 pipe, sharpen one end and drive it in the
carpet,
after adjusting to avoid cutting anymore carpet then necessary.)
You then
drill through the pipe. The pipe will protect the carpet from
getting
caught in the drill.
When you are sure of the location (not over a beam or joice), cut a
rectangle
of the correct size (smaller than the outside of the face plate; see
Cana-Vac’s
manual) but large enough for the inside of the face plate. You
can use a
wide wood chisel to cut the carpet. Mark the rectangle with a
ruler and a marker pen. Drill or use a reciprocating saw to make
a hole
in the
floor, keeping the drill or saw from catching the carpet.
1. Electronic stud finder, to find studs
for mounting
the power unit. Also to determine if the wall is clear if you decided
to
install the inlets in the walls instead of the floor.
3. Hole saws. 2 9/16" is the best. If you have to
drill in a tight space 2 1/4" is the smallest. This is for making a
hole in a
tight
space. If it has to go more than 2x4 depth, you need a larger
hole for
some play to work in. Otherwise, you will find that drilling holes
perfectly
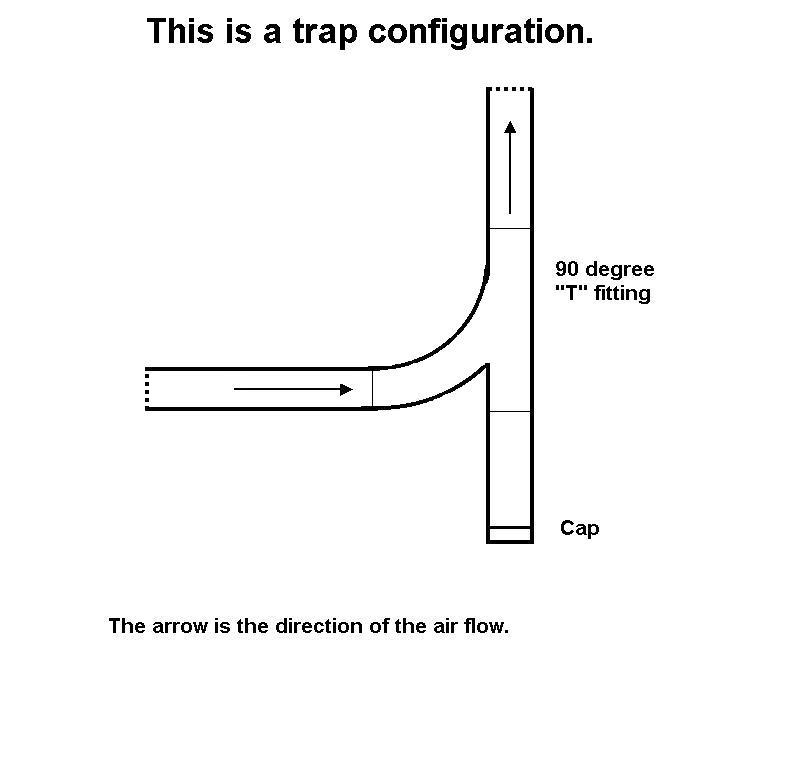
straight is not possible. Putting a 90 degree fitting on a tube at a
slight
angle is a pain, and if you do get it together, it will have a lot of
stress on
it and will probably leak.
4. Utility knife, for reaming out the tubing, cutting sheet
rock.
5. Long small wood drill bit 1/16" to 1/4" for probing, and
determining if it is clear under the proposed inlet site. A
small
hole will not show if the spot is not used. Be careful not to
drill
something like a heater duct, water pipe or ABS drainpipe. Look
very
carefully before drilling even the test hole. Pipes can be behind
things
like blocking and other supports and not visible.
6. Straightened coat hangers. To put in test hole and go
under the
house to see if the location is OK. Use white or another light
color.
Black is hard to see under a house.
7. For existing homes the inlets are installed in the floor.
This only requires simple tools, 1/2" drill, and saber saw, to make a
small hole in the floor.
8. Metal/AC locator. For avoiding drilling into
metal
pipes or wires, will not detect plastic pipe.
9. Rags and drop cloths for spills and messes.
Not much to say about this!
10. Square and level, to
make the face plates look nice and to mount the unit.
Consider Renting Professional like Milwaukee Right Angle
drill,
Milwaukee
Hole Haug, or the equivalent in other makes. Reciprocating saw
like
Milwaukee or Porter Cable, Milwaukee self feed bits, 2-1/4" minimum to
2-9/16", drill extensions, 2-½” tubing cutter, tubing
reamer.
Also heavy duty ladders you do not what to fall down with a 30 pound
drill!
For drilling concrete rent
a 2-½” concrete hole saw and
drill or an electric jackhammer. The less
expensive way is to drill
a bunch of
holes and chisel the rest out, (if you have the time and arms).
For installing a vacuum in homes under construction, there is lots
of
drilling to do. Deep holes (over 4" or so) cannot be done without
the
stronger professional drills and the self-feed bits (unless you want to
stop
and take the plug out of the hole saw every couple of minutes). A
home ½”
drill can be burned out quickly installing a vacuum system in a home
under
construction. I take two boxes of tools on the job
site and
sometimes I need something I do not have! I cannot list all the
tools you
might need, especially installing in a house under construction.
Warning: Do not attempt to install a vacuum system in
a home
under construction without professional tools! These tools
are
needed for homes under construction since the holes have to be drilled
into the
2x4's, floors and joices, sometimes 2 or three or four 2x4's
together. I
have even had to drill up through a 16" header; a 12" header is hard
enough.
If you are building a home, have the general contractor or plumber
drill the
holes for you. You will still save money by installing it
yourself even
if a contractor does the drilling.
1. Electrical tape, white tape for visible tubing
(near
power unit); black will do for most of the installation.
2. Plumber’s strapping tape and large head nails, long roofing nails
work
best. Metal or plastic will work.
3. Scrap wire, for hanging the tubing temporarily while
arranging it
in and allowing the glue to set. Rebar strapping wire works great
and is
inexpensive.
4. Knee and elbow pads.
5. Flashlights and work lights, under the house the "head light
works
great".
6. Eye protection, to keep glue from dripping in your eyes while
working
under the house.
7. Hat and gloves, also to keep glue off your person.
8. Multipurpose solvent/glue if using ABS pipe with the vacuum
system PVC
tubing.
9. If you are sensitive to PVC solvent and ventilation is not
possible, i.e.
fan and/or open windows, you will need a filter mask. This needs to be
a mask
that can take out PVC fumes. Ask the salesperson in the hardware store.
10. PVC solvent/glue. Purchase the gray instead of
clear. You
can use clear for visible areas like to the power unit on surfaced run
in closets
or the garage. You can just look at your plumbing to see if it has been
glued
with the gray glue.
11. MEK, METHYL ETHYL KETONE. One
of the many solvents of
PVC plastic. It
will clean up spilled glue and thin thickened solvent. This is toxic
stuff;
keep out of reach of children. MEK can be found in most hardware
stores.
Do not get in on your hands! If you get glue on your hands
while
working peel it off with soap and water, do not use the MEK. Wear
gloves when gluing
to
prevent this.
This document was written By Kevin E. West can be downloaded for
printing
but cannot be reproduced, sold, linked or used by anyone except for
personal
use.